Magnetic Flux Leakage detects anomalies in normal flux patterns created by discontinuities in ferrous material saturated by a magnetic field. This technique can be used for piping and tubing inspection, tank floor inspection and other applications. In tubular applications, the inspection head contain is made up of drive and sensor coils and a position transducer that are connected by cable back to the power source and signal processing computer. This head is placed around the pipe or tube to be inspected and the drive coil is energized, creating a magnetic field in the part. As the head travels along the length of the part, variations in the wall thickness due to corrosion, erosion, pitting etc., will cause a change in the magnetic flux density can be picked up by the sensor and sent back to the computer. The location of this signal is sent by the position transducer so that the area detected can be marked for further evaluation. This technique can be done without removing the insulation, resulting in a fast, economic way to inspect long runs of pipe or tubing.
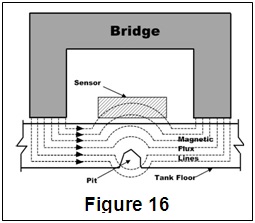
Tank floor inspection applies the same principle, but uses a series of magnetic field generators ("bridges") and sensors (as shown in Figure 16) located side by side across the front of a vacuum sweeper-like machine. The bridges generate a magnetic field that saturates the tank floor, and any reduction in thickness or loss of material due to pitting or corrosion will cause the field to "leak" upwards out of the floor material where it can be picked up by the sensors. On very basic machines, each sensor will be connected to an audio and/or visual display that lets the operator know there is an indication; more advanced machines can have both visual displays and recording capability so that the results can be stored, analyzed and compared to earlier results to monitor discontinuity growth.
Follow us On ...
© 2026 NDT|API|ASNT|WELDING INSPECTION|Training Courses In Trichy-TamilNadu.
